

In this guide
A double uni connects two lines by forming a uni knot in each end, then pulling the two knots together. It can join a main line to a leader, the short section nearest the lure. It is easiest to learn with two colours of practice cord before moving to the actual fishing lines.
Choose compatible materials
Similar diameters make a sensible starting point. The knot is used for mono-to-mono and some braid-to-leader connections, but a very thin braid paired with a thick leader needs product-specific guidance. More turns on the braid side may be required; there is no single wrap count that suits every product.
The finished connection is bulkier than some specialist leader knots. If it must pass through small rod guides repeatedly, check that it travels cleanly and inspect it for wear. A short leader that keeps the knot outside the tip during casting is another option when the fishing method permits.
Tie the connection
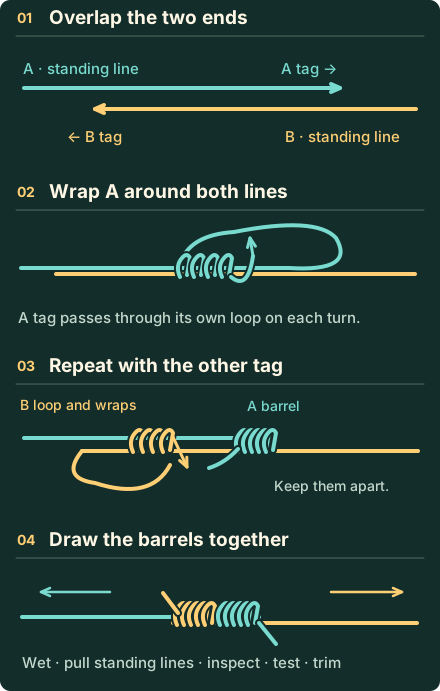
Read the detailed tying instructions
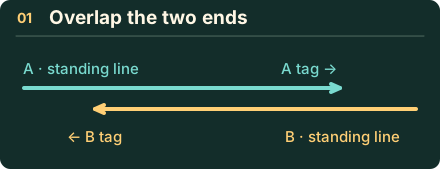
- Overlap the two lines, with their tags pointing in opposite directions. Leave enough overlap to form two loops without running out of tag.
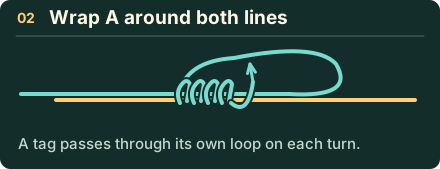
- With the first tag, make a loop beside the overlapped lines.
- Wrap that tag around both lines and through its own loop. Use the line maker’s count; six to eight turns is a manufacturer example, not a universal rule.
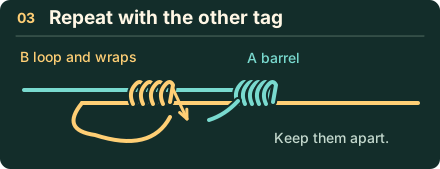
- Moisten and pull this tag to form a neat barrel. Leave the barrel away from the other end for now.
- Use the other tag to make a second loop and opposing barrel around both lines. Apply the appropriate count for that material.
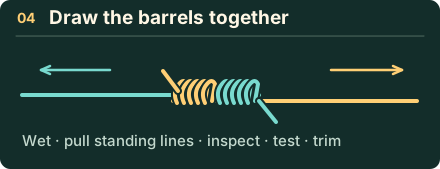
- Wet the connection and pull the two standing lines in opposite directions. The barrels should travel together and meet.
- Inspect both sides and pull-test safely. Trim only after both knots have seated, leaving visible tags.
When to start again
A barrel that opens, slips or contains crossed turns needs retying. Check each component separately before blaming the join: damaged leader, an old main-line end or a rough rod guide can also cause failure.
Make the next practice useful
Record the actual line products and diameters you use. Repeat the connection at home until the barrels form predictably, then try drawing the knot through your own guides without a hook attached. This practice checks assembly and fit. It does not produce a certified strength percentage or prove that a large diameter mismatch is suitable.
Questions from the bank
Keep it helpful. Comments are moderated. Do not share precise locations or personal information.
No approved comments yet. Ask a practical question or share what you learned.