

In this guide
The improved clinch fastens a single strand of line to a tackle eye. It is a useful first knot for light monofilament because the wraps and finishing loops are easy to inspect. The standing line runs back to the reel; the tag end is the short working end you will trim.
Choose the right job
Start with nylon monofilament and an eyed hook or practice ring. Fluorocarbon can be stiffer, so check the line maker’s instructions before using it. This lesson does not recommend the standard improved clinch for braid: slippery constructions may need a different knot or a manufacturer-specific method.
What you need
Use sound line, scissors and a large closed ring for practice. A ring lets you learn without a hook point beside your fingers. Leave a generous tag so you can see the final tuck clearly.
Tie it in six steps
Open the complete illustrated sequence · Illinois DNR knot instructions
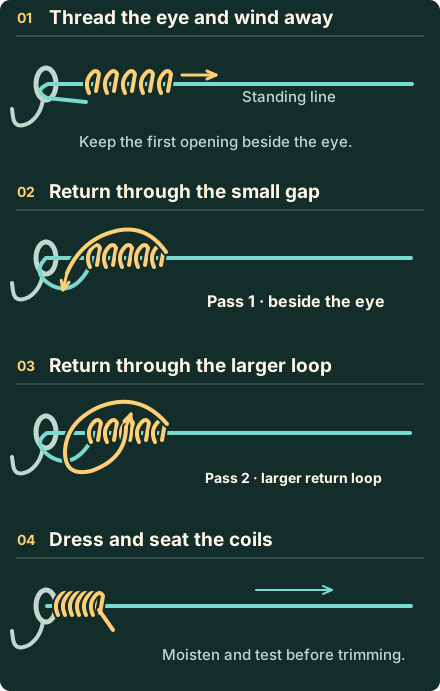
Read the detailed tying instructions
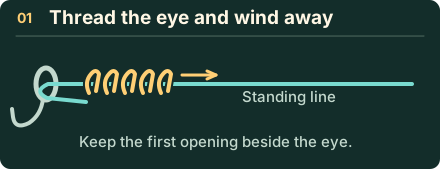
- Put the tag through the eye and pull through enough line to work comfortably.
- Wrap the tag around the standing line five or six times, moving away from the eye. Keep each turn beside the previous one.
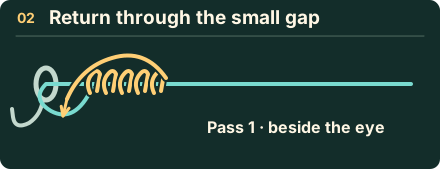
- Bring the tag back down and pass it through the small opening immediately above the eye.
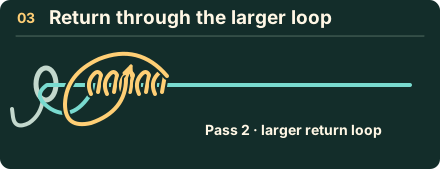
- A larger loop now lies beside your wraps. Pass the tag through that loop too. This extra pass makes the improved version.
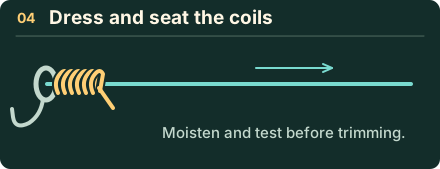
- Moisten the line. Draw the wraps together slowly, then pull the standing line to seat the knot against the eye while controlling the tag.
- Inspect and test the connection before trimming. Leave a visible tag rather than cutting flush with the coils.
Read the knot before fishing
The finished coils should sit compactly, without one turn crossing over its neighbours. If the line looks kinked or scraped, cut that section off and retie. A curly end after failure often suggests slipping, but it cannot diagnose every failure.
Common mistakes
Missing the second finishing pass produces a different knot. Pulling fast on dry line can damage the material, while a very short tag makes the final tuck difficult. Do not keep adding arbitrary turns to rescue a poorly formed knot.
Practice check
Tie three examples on the same line. Pull each steadily with the ring secured safely and your hands protected; never wrap fine line around bare fingers or pull toward your face. Consistent shape and a successful pull check are useful habits, not a measured strength rating. Next, learn the Palomar for a different terminal connection.
Questions from the bank
Keep it helpful. Comments are moderated. Do not share precise locations or personal information.
No approved comments yet. Ask a practical question or share what you learned.